

Any of ya'll been coveting a vacuum oven for doing your final purging and processing, but have been stopped by the high cost of new ones and the poor temperature control of used ones?
Here is a simple fix, though we of course had to make it complicated getting to our final stage, so I will share with you the steps that we took to arrive where we did.
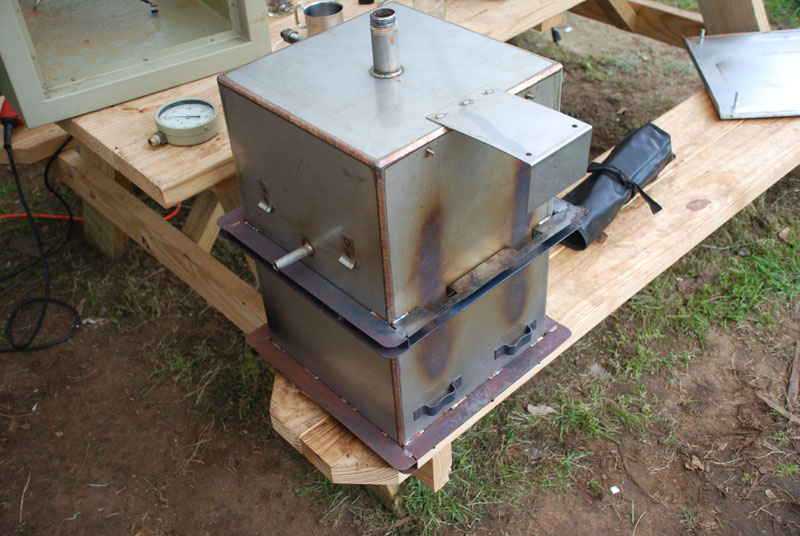
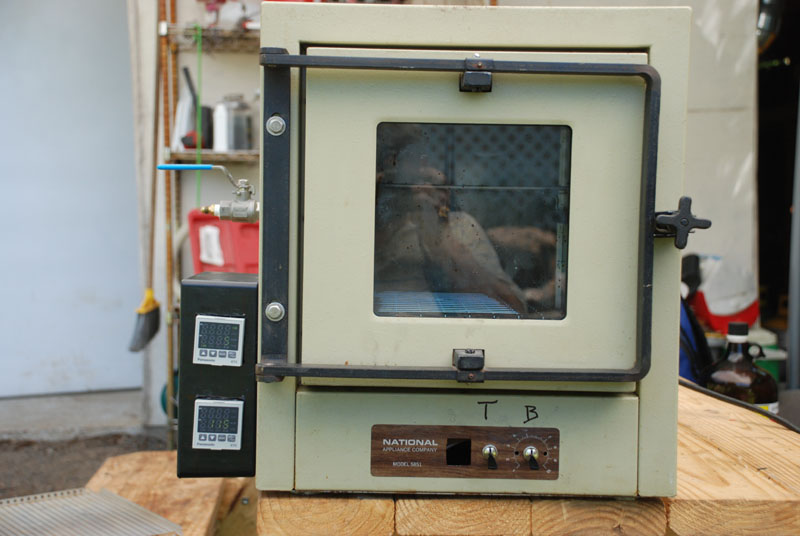
First we bought a used Napco 5851 Vacuum Drying Oven, listed as working, but that actually meant that it heated up when you turned it on.
The Napco design consists of an inner stainless steel can that is under vacuum, and an outer shell with glass insulation in between.
Heating was accomplished using two 500W strip heaters bolted to the bottom of the can and controlled by a capillary tube mechanical thermocouple clipped to the side of the inner can.
I first replaced the mechanical thermocouple and control with a Type K thermocouple and a Panasonic AKT4112200 SP20 self teaching temperature controller.
I inserted the Type K thermocouple though a compression fitting in the existing port in the rear of the oven and added a Crydom solid state relay between the oven heat strips and the 12V DC control output.
Growgeek programmed the puppy and tests were made, but alas, while every thing worked, it wouldn't maintain closer than minus 5, plus 60 degrees F of set point, even after being in self teach mode.
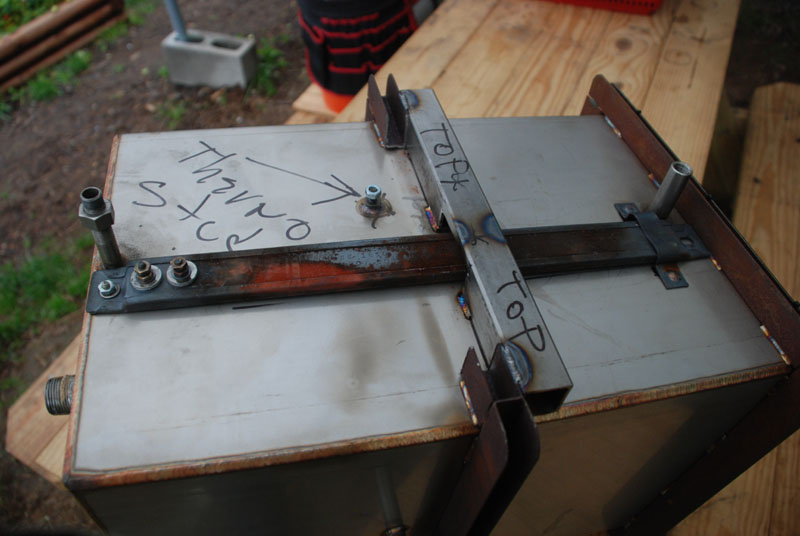
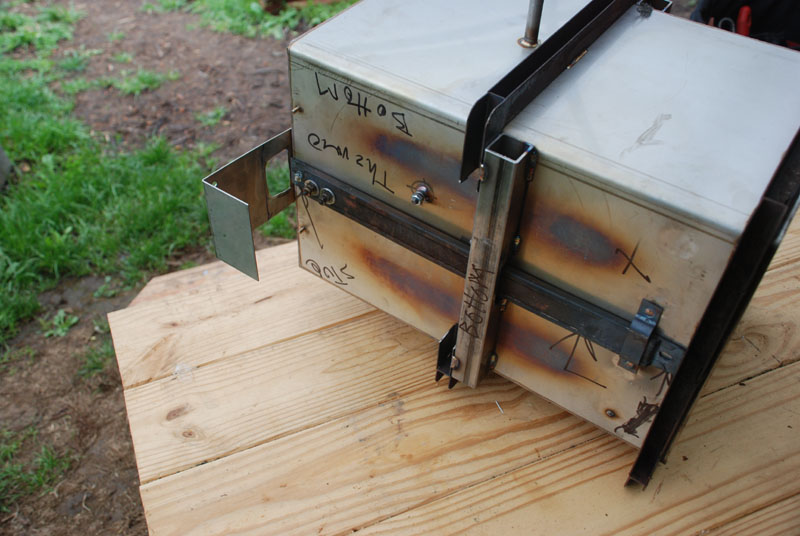
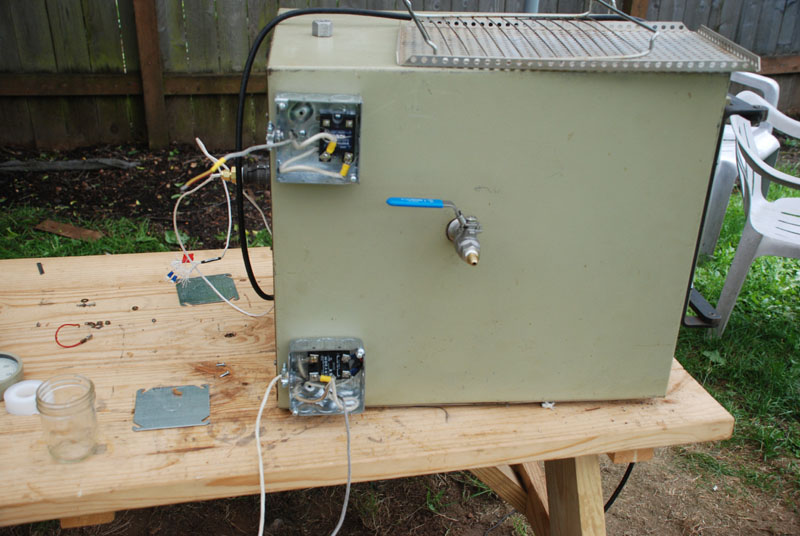
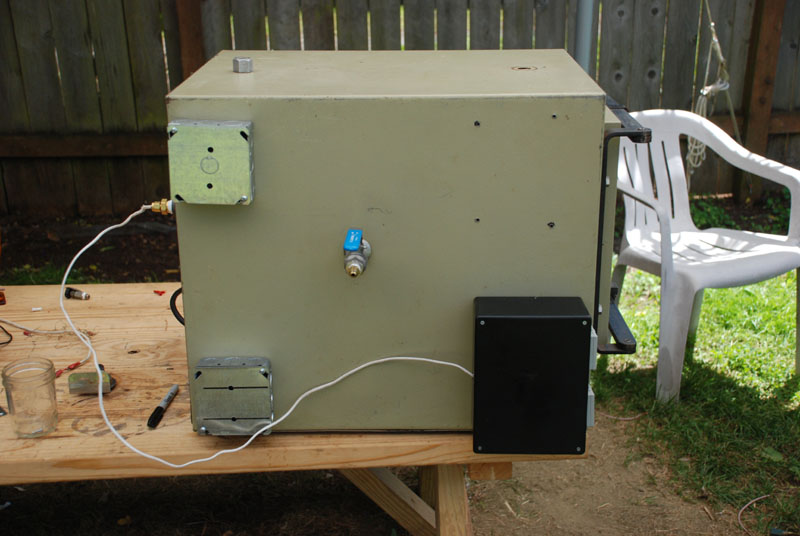
Sooooo, I took the oven completely apart and rebuilt the outside stiffeners enough to allow me to relocate one of the heating elements to the top of the oven and center the other one on the bottom. I also had lugs welded on for the heat strips at their new location, as well as for Type K thermocouples on both the top and bottom of the oven can.
I initially started out with two Panasonic Temperature Controllers actively controlling one heat strip each and getting feedback from its on dedicated thermocouple, but alas the swing was still excessive, soooooo, I disconnected the top heating element completely and heated with only the lower element.
I hooked the original Type K thermocouple in the center of the oven space to the second Panasonic, in read only mode, so that the lower controller controlled the temperature of the oven shell and the second Panasonic read the actual temperature of the work area.
Hee, hee, hee, if you take enough stabs at it, you can get close, and it looks like our final arrangement will fill our needs in the 85F to 115F control ranges, that have thus far eluded us with this oven.
The other thing we found of course, is that if we start at ambient and set the controller at 115F, by the time the temperature hits 115F, there is excessive hysteresis in the heating element and oven can. As a result it will overshoot wildly and take a while to settle back down. We therefore only raise the temperature 5 degrees at a time until we settle in at set point.
I also added two switches between the controllers and the solid state relays, so that I can turn off either element or both. We reserved the ability to use the upper element, and controlling it with the lower controller, in case we need to run some processes later at higher temperatures.
6-11-12
Lu lu lu lu lu lu lu lu lu lu lu!!!!!!!!!!!!!!!!!1 Hee, hee, hee, snicker, snark, snort.............................. Just ran trials, and the controls hold the oven dead on what ever we set it at. Plus nothing, minus nothing.
There is about 5F delta T between the Type K can ring thermocouple and the Type K sticking the center of the oven at 100F. The second thermocouple is of course reading radiant energy!
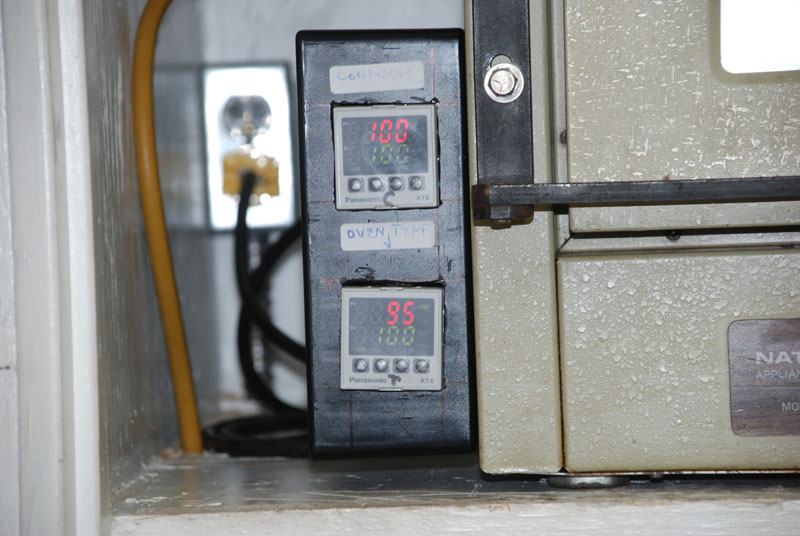
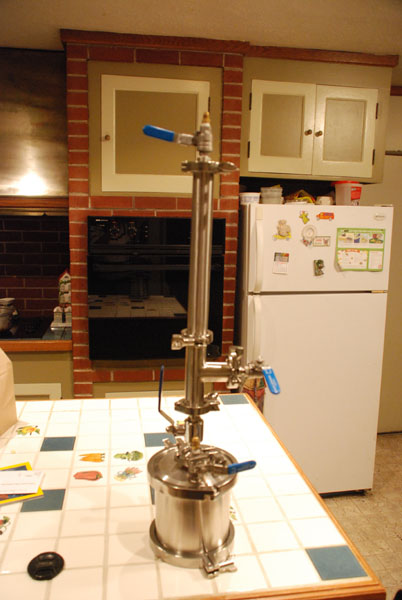
Here are some pictures of our progress and final oven:
GW I love the oven upgrade, Ill have to give this a try. When your doing your shatter runs you I've seen you say you pull down to 29.5 inches @ 115 degrees F, is that absolute vacuum for your altitude?
How do you control or regulate your vacuum? I'm no expert but don't you want to hold it around 29.4 so you don't boil away cannabiniods?
Our ovens have vacuum control valves, but another way to do it, is to let the pump run wide open, and bleed in N2 gas to keep the vacuum levels down. The nitrogen atoms blasting through on the way to the pump, will knock loose and carry along HC molecules. GW
Hello there, was just chiming in to ask a quick question. What is the gauge of the steel used for the internal can?
Looks like 10 gauge. GW
GW thanks for all you do. As a small batcher always looking for inexpensive low heat methods 90- 115 what do you think of quality digital dehydrators there's some as low as 80 degrees can change increments 10 degrees ?? or better off scientific hot plate
I haven't tried any dehydrators, but have tried a few hot plates and was dismayed to find that most of them, including the scientific lab stirring hot plates, didn't have fine control at 85F/150F. A notable exception is the Cat Scientific hot plate that we've been testing, which is rock solid at those temperatures. Neither of our stirring hotplates are cheap however. Cheaper is a silicone heat mat with controls.
Have you considered changing out the heating elements for low wattage versions? 500w is WAY too much too achieve your desired temp range. While they make take longer to initially warm up they dont have temp spikes. 50w or less might work just fine even for the size oven you have... a smaller element on each wall of the chamber will do a much better job of keeping temp then two larger ones no matter where you put them. Keep in mind within a vacuum environment heat is not transfered through the air but through the metal itself. A solid vs perforated rack will make a differance too. heat tape surrounding the entire oven might even be your best bet. iv seen someone else you referanced use reptile heat tape. The tape itself at full power will not reach over 175 and that takes some time with a single layer and more importantly IMO it heats slow and therefore temp changes are slow. if I remember correctly the 12" wide tape was 23 watts per foot. Add to it your PID controller and it should work good. Try covering the thermocoupler with some aluminum tape or something of sorts as so to get the surface temp and not surrounding temp. And purchase a surface temp guage to check internal shelf temp under vacuum vs the PID controllers setpoint and reading. Oh... if you happen to try the low wattage silicone heat mats they also heat up way too fast and overshoot! :/
Thanks for the input bro! Yes I did consider replacing the oven elements with smaller ones on all four walls, but decided to see what I could do with the existing ones first. Once the oven was good enough, my motivation to improve it lessened and its priority on the list dropped. True story, the heat in the oven can is clearly transferred by conduction, and in the absence of air, heat inside the oven by radiation. A solid shelf does change the dynamics, and we've had good luck using a 3/4" granite shelf to even things out in another oven. Interesting idea putting aluminum foil on the thermocouple, I'll give it a try. I infer it is to add surface area, as the metal thermocouple also sees the same radiant energy. Already got a shelf temp gauge, just don't trust its accuracy. Do you have a good one that you like?
sometime during class,you did show us this kick butt oven , so wondering? what style of thermocouple to use as I want to install a toaster oven with a headphone jack that's wired into the oven t.c also into a hot plate or would it make more sense to hook this pid to a receptable ? I do under stand a relay would be included ,this idea is stuck in me head so if ya got time Id like to hear your thoughts
I used a Type K ring thermocouple to monitor the outer can temperature and a Type K 1/4" tube style thermocouples. I welded a 1/4" stud on the can for the ring thermocouple. The latter sticks into the center of the oven through a 1/4" compression fitting. I used Crydom solid state relays to control the elements.
We have found that when the internal TC makes contact with the shelf the tempature of the product is much more stable. Give it a shot and see what you think.
Looks like you have some experience given your addy, so may I ask you to share more? For instance, what size are your heat strips and where are they located, that are controlled by the TC in contact with the shelf. I first started by removing the old controls and using a contact thermocouple at the center shelf, but with the strip heaters mounted to the outside can, we had tremendous hysteresis and were unable to control the temperature within 50F, even with a self teaching controller. Using the bottom ring mounted TC immediately adjacent to the strip heater for control, it essentially is the bottom shelf in the oven, though I added a wire tray to keep our process dish from making actual contact with the bottom, because of local hot spots. Any insight that you might share on how you control the hysteresis when the heater is so far from the TC and in a vacuum, would be greatly appreciated, because we do prefer to precisely control the temperature at the actual work surface.
This gets tricky! Temperature control inside a vacuum chamber requires a controller with PID profile settings made to accomodate the very slow conductance of heat. As there is no atmosphere (air) to conduct the heat in the vacuum, the heat has to travel from the heaters, through the walls, across the shelves, through the tray into the product. With a simple closed loop thermostat and temp probe you will have an issue with temperature overshoot. Consider the temperature control loop: the probe senses the temperature (which is quite low because all ambient air has been evacuated), the probe screams for heat because it is chilly and the controller yells at the heaters to burn, the heaters crank on and begin heating the walls of the chamber, the probe continues to scream for heat, the heaters continue to heat the walls and slowly the heat moves across the shelves. On a well-engineered system, the temperture probe will be in contact with a shelf so that it gets some heat. If it is pointing out into the empty void of the vacuum chamber it will still be icy cold even though the heaters have generated a massive heat load at this point. Once the probe sees heat you have a bulky stainless steel vessel that is wicked hot and sloughing heat that has to go somewhere. Now you have the real potential of temperature overshoot. The slowness of the heat conductance to the probe makes auto-tuning or self-teaching modes almost obsolete. there is a reason Nature abhors a vacuum!
Thanks for sharing Cathrine! We're controlling the temperature of the lower shelf in the can dead on at set point, plus nothing, minus nothing, using the ring thermocouple bolted to it. The thermocouple in the center of the oven measures radiant heat, and trails the can temperature 5 to 11 degrees, depending of the set point temperature. That temperature is as important to us as the shelf temperature, as it is what the top of the oil pool is seeing, so we control with the lower thermocouple and read both it and the top one for process control.
We use the same oven and haven't had a problem with the temp controls yet. We were able to reset the thermostat to the lowest setting by taking the original knob off and and using the set screw on the thermostat. Our full temp range is about 80F- 350F. 3 on the dial usually works out to 100F depending on the outside temp. But we confirm with digital(inferred) thermometer and the dial thermometer with internal mounted node. But I was wondering if there were upgrades that could be done without all the additional modifications. I don't think we have quite the experience to do these changes while they dont seem to difficult.
The oven seems to operate exactly at set point using just the lower element, so one possible upgrade, would be to just disconnect one of the lower elements and weld on a stud for a Type K ring thermocouple. You could then wire in a digital controller like the Panasonic. Both elements together appear to have too much enertia at 500 watts each, for precise control. You could also replace the two 500W strip heaters with units about half that size, to address the same issue.
yes I found a digital heating pad made by cara. easily found online have min. temp 86 - 171 max. I personally think it doesn't get over 150 I use it around 120 - 130 it has a 60 min timer some might like or no.t.It's my poor mans vac oven, with patience and time get a excellent result. Not as convenient as a real vac oven but for $29. If you have metal chamber can sit right on pad.