Those of ya'll who have been following our progress with the Mk I and II Terpenators, as well as the Lil Terp passive extractor and Enabler compound fractioning still, will be interested in our new Mk III Terpenator, based on the Lil Terp chassis.
This is just one more configuration possible with the Lil Terp tanks, simply by changing out the modified lids and bolting on readily available parts.
You will note that the collection tank is a simple 6" X 6" sanitary spool, with a standard end plate and clamp for both top and bottom. We laser cut and machined new bottoms for the first Lil Terp series, but that is not necessary starting with a 6" spool. The top plate is the only piece in the whole assembly, that is not standard off the shelf at either Glacier Tank, or at Paramount Supply.
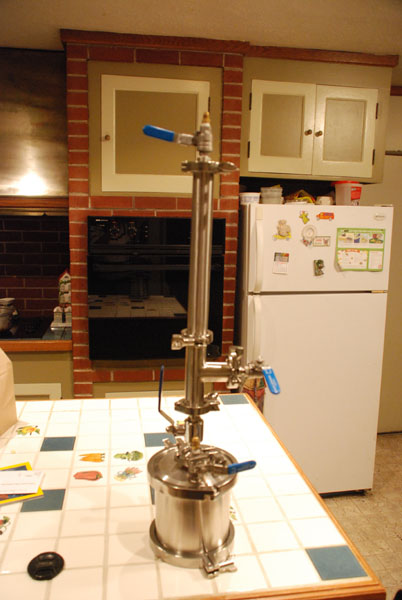
This picture is a mockup of both Lil Terp and Mk III Terpenator parts, but I will post the final assembly with the correct parts, when they arrive back from the machine shop and welder.
The column shown holds about two ounces, but the system will accept longer columns. Cycle time is unknown until we run trials with our prototype, but with the same sized pumps and smaller volumes, we are expecting it to be faster than the Mk I, which processes about half a pound per cycle.
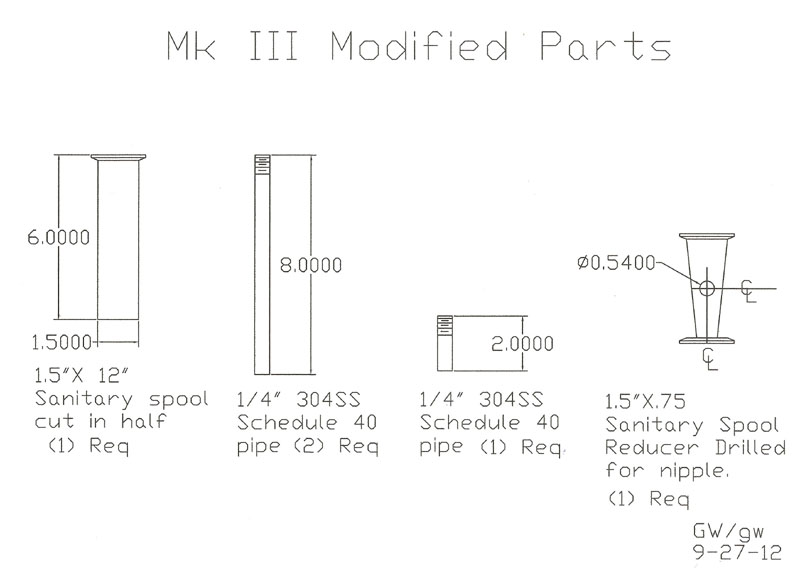
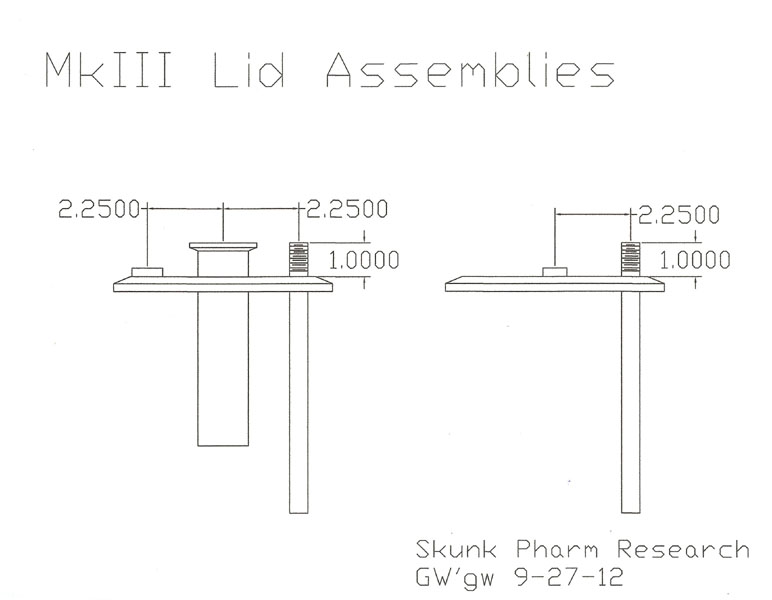
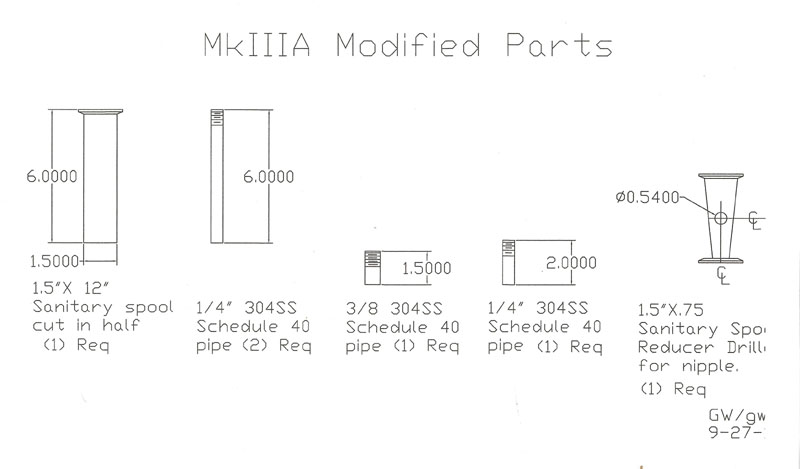
Here is the lid maching detail. I'm also replacing the long Tee for butane injection, with a more petite one made from a short reducing spool and a 1/4" 304SS nipple. I'll post pictures when I get the pieces back from the machine shop:
Here is a preview treat of the Mk IV layout mockup, which also has parts out for machining" 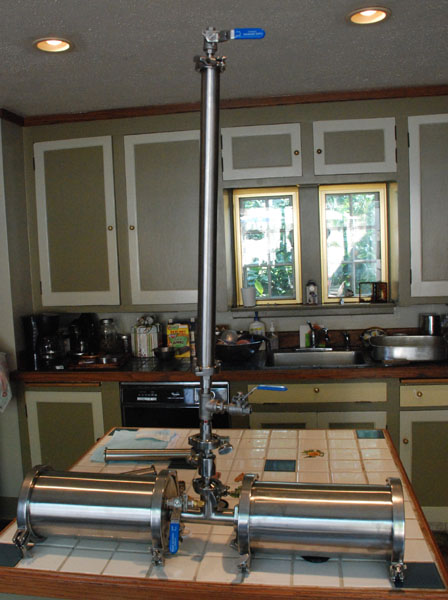
Hee, hee, hee, the Mk III parts are back from the machine shop and ready to be welded. 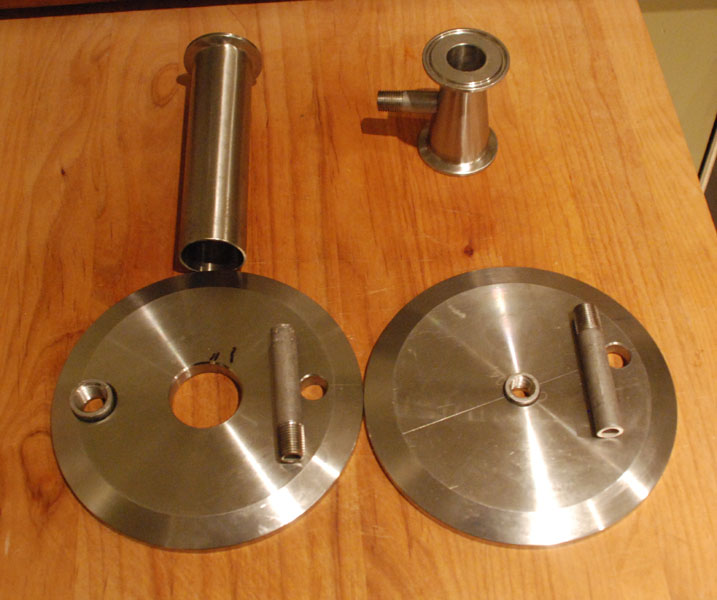
10-3-12
Lu lu lu lu lu lu lu lu lu lu lu lu lu lu lu lu lu!!!!!!!!!!!!!!!!!!!!! It lives! The Mark III lives!
Hee, hee, hee, here is the purdy lady and her butane storage tank complete and ready for testing! 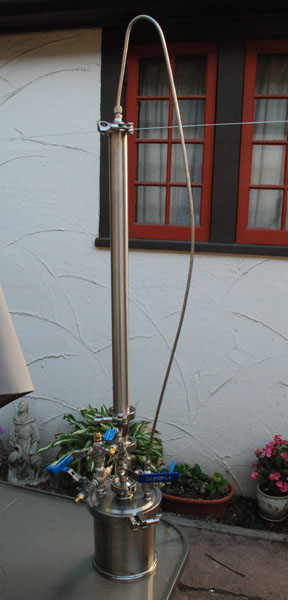
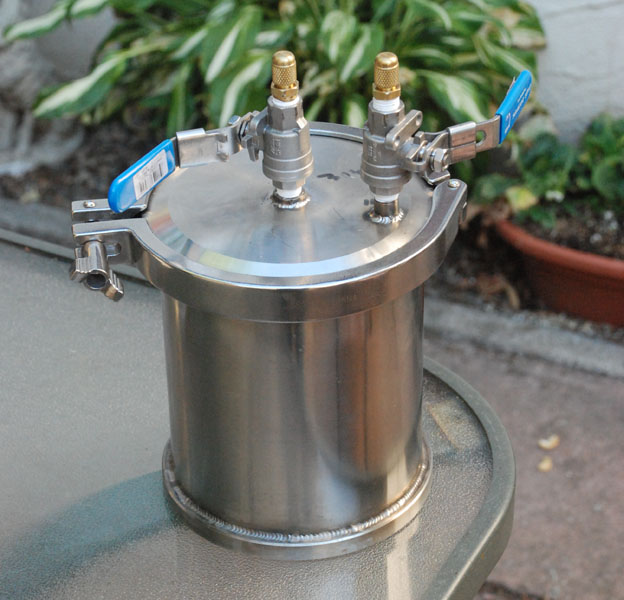
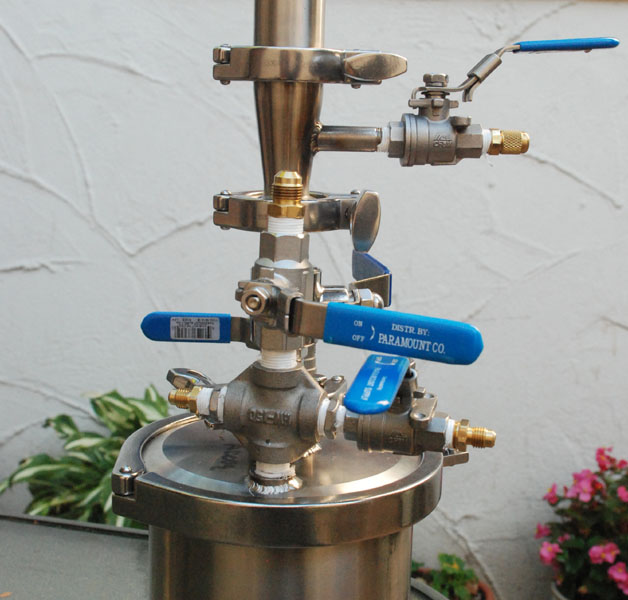
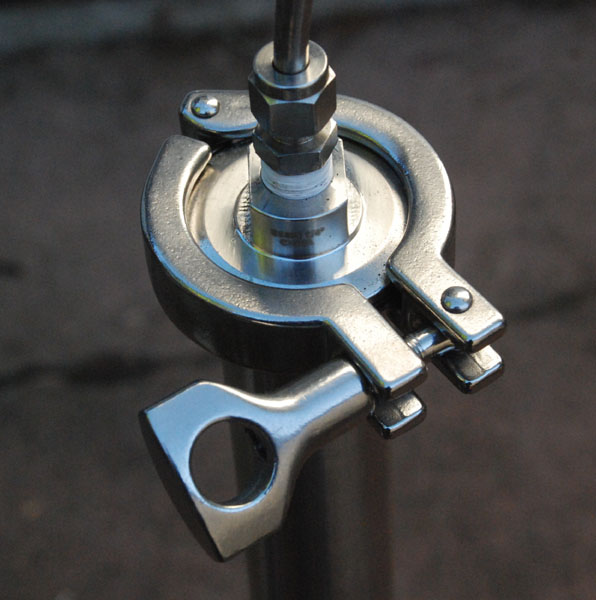
10-3-12
Lu lu lu lu lu lu lu lu lu lu lu lu, whoop, whoop, ahwhoooooooooooooooo!! Hee, hee, hee, snicker snark snort..................
The Mk III worked and ran like a Formula I on the Appion twin, and actually beats the throughput of the Mk IA, albeit with a column change in the middle.
Not counting the first cleaner load running leaf, I ran five column loads, of three different strains and material grades, and they weighed from 135 to 200 grams, all packed in the same 1.5 X 24" column.
The thing that is mind boggling after running the Mk IA, which will process about 470 grams per hour of prime bud, is that although the Mk III has a column capacity 33% less than MklIA, it processes it through the same number of cycles in 12 minutes. It therefore can run four cycles per hour, vis a vis the Mk IA's about 25 minutes per cycle, or two cycles per hour.
That is not counting the 5 minutes hard soak at the end of a series of runs of the same strain, which both the Mk IA and III add on to a series, but not to each cycle.
The Mk IA processes about 470 grams in two 235 gram cycles, in the same amount of time that the Mk III processes about 600 grams in 4 cycles.
The Mk III is actually so fast using the Appion, that the pressure gauge on the first reclaim cycle, looks like the minute hand on the clock as it falls.
The second flood and recover cycle is not quite so fast, as more butane made it through the second cycle, and the third is of course the long one, because it is evaporating butane out of the now open column as well.
As I don't have column heat on the Mk III test sled, the columns iced up on the last cycle, which was slooooow compared to the first two, so I will add column heat.
That was the only time available to stuff the next column, because the other cycles are happening too fast to not pay close attention.
Peak operating pressure in the Mk III ran about ten psi higher than the Mk IA, at 45/50 psi, compared to the Mk IA's 35/45 psi. All well within the component pressure ratings.
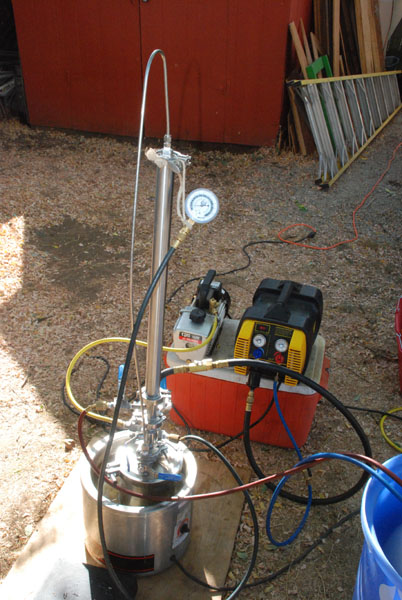
The only thing that didn't go very well, was my picture taking, with most of the equipment in mixed shadows under a tree, but got one that demonstrates the point. Alas no good oil shots, as the light wasn't suitable for in the pot and we washed it out with ethanol for winterizing.
I promise to do better with the pictures next time and will report the yields after winterization is complete.
One thing that we did do, that departs from the original plan, is to use a 50# refrigerant recovery tank, instead of our fabricated one, to speed thing up with its greater condensing area and lower price.
Here is the parts list and costs. I will try to get a more finite breakdown on labor, with the next build. The total included building a storage tank as well and extra set up time for a single run, so ostensibly future labor will be less. Mk III Terpenator parts list
| NO | ITEM | PN | REQ | PRICE | COST | Source |
| 1 | 1/4" 316SS tubing/.035 wall | $0.97/ft | $3.88 | Paramount Supply | ||
| 2 | 1/4 NPT to 1/4" Compression 304 SS | 4CM4316 | 2 | $6.8 | $13.60 | Paramount Supply |
| 3 | NPT 1/4" female X 1 1/2" triclamp end cap 304 | 1 | $10.95 | $10.95 | Glacier Tank | |
| 4 | Triclamp 1.5" High Pressure Clamp Bolted | 4 | $9.95 | $39.80 | Sanitary Steel | |
| 5 | 1 1/2" X 24" Sanitary spool piece | 1 | $45 | $45 | Glacier Tank | |
| 6 | VITON Gasket 1.5" | 2 | $1.95 | $3.90 | Sanitary Steel | |
| 7 | BUNA Gasket 1.5" | N/A | 2 | $20.95 | $41.90 | Sanitary Steel |
| 8 | BUNA Gasket 6" | 1 | $5.95 | $5.95 | Sanitary Steel | |
| 9 | 1 1/2 X 1" Sanitary concentric reducer | 1 | $12 | $12 | Glacier Tank | |
| 9.1 | 1 1/2" sanitary X 3/4 ball valve | 1 | $25 | $25 | Glacier Tank | |
| 9.2 | 1/4" X 4" 304 SS Schedule 40 nipple 1/2 used | 1 | $1.41 | $0.71 | Paramount Supply | |
| 9.3 | Modify by machining | 1 | * | * | Moody Machining | |
| 9.4 | Weld | 1 | * | * | Gibson Welding | |
| 10 |
|
3 | $12.95 | $38.85 | Sanitary Steel | |
| 11 | 1/4" JIC 37 Degree Male Flare x 1/4" MNPT 304SS | 3 | 5.95 | $17.85 | Sanitary Steel | |
| 13 | 1 1/2 X 12" (1/2 of) sanitary spool | 1 | $35 | *$17.50 | Glacier Tank | |
| 14 | End Cap 6" | 1 | $28.95 | $28.95 | Sanitary Steel | |
| 14.1 | Modify lid by machining | 1 lot | * | * | Moody Machining | |
| 14.4 | Weld | 1 lot | * | * | Gibson Welding | |
| 15 | TriClamp 6" High Pressure Clamp Bolted | 2 | $38.95 | $77.90 | Sanitary Steel | |
| 16 | 3/8" 304SS half coupling | 1 | $1.20 | $1.20 | Paramount Supply | |
| 17 | Hex Nipple 3/8" MNPT x 3/8" MNPT 304SS | 3 | $6.95 | $20.85 | Sanitary Steel | |
| 18 | 4 Way Pipe Cross 3/8" FNPT Female Pipe 304SS | 1 | $23.95 | $23.95 | Sanitary Steel | |
| 19 | Hex Nipple 3/8" MNPT x 1/4" MNPT 304SS | 2 | $7.95 | $15.90 | Sanitary Steel | |
| 20 | Hex Nipple 1/4" MNPT x 1/4" MNPT 304SS | 4 | $7.95 | $31.80 | Sanitary Steel | |
| 21 | 3/8" 2 piece Stainless Steel Ball Valve 1000# 304SS | 1 | $12.95 | $12.95 | Sanitary Steel | |
| 22 | 3/8 MPT X 3/8" male flare brass | 1 | $0.76 | $0.76 | Paramount Supply | |
| 23 | 1/4" X 7" 304SS nipple/Threaded one end | 1 | $4.32 | $4.32 | Paramount Supply | |
| 24 | 6" X 6" sanitary spool from 6" X 12 spool | 1 | $105 | *$52.50 | Glacier Tank | |
| 25 | Tank bottom laser cut to size | 1 | $32 | $32 | BBC Steel | |
| 26 | Tank bottom machining | 1 | * | * | Moody Machining | |
| 27 | Weld tank bottom inside and out | 1 lot | * | * | Gibson Welding | |
| 29 | Total materials | $492.88 | Materials only | |||
| 30 | Actual machining and welding labor | $180 | Labor only | |||
| 31 | Total cost to build | $672.88 |
* Breakdown not available. Use actual lot costs for total
** 1/2 left over for a potential second unit.
10-20-12
Progress has been made! I set up an aerospace quality manufacturing network to build Mk IIIA kits, and we licensed manufacture and distribution to Specialized Formulations, who now has a sample lot of five Mk IIIA lid and injection tee kits being machined and welded, to the latest design. http://specializedformulations.com/
The Mk IIIA design differs from the original Mk III, from the standpoint that the 3/8" half coupling was replaced with a 3/8" nipple and the cross assembly welded in place to clock it properly and eliminate two threaded joints.
The Mk IIIA design also incorporates a 6" X 6" sanitary spool for the lower tank, as opposed to splitting a 6" X 12" sanitary spool and welding on a new bottom. The new arrangement uses a tri-clamped end cap for a bottom, which costs less overall and allows easier cleaning.
The Mk IIIA can use either passive heat and cold techniques for recovery, or a refrigeration pump to reduce cycle time to less than 15 minutes, as with the Mk III. 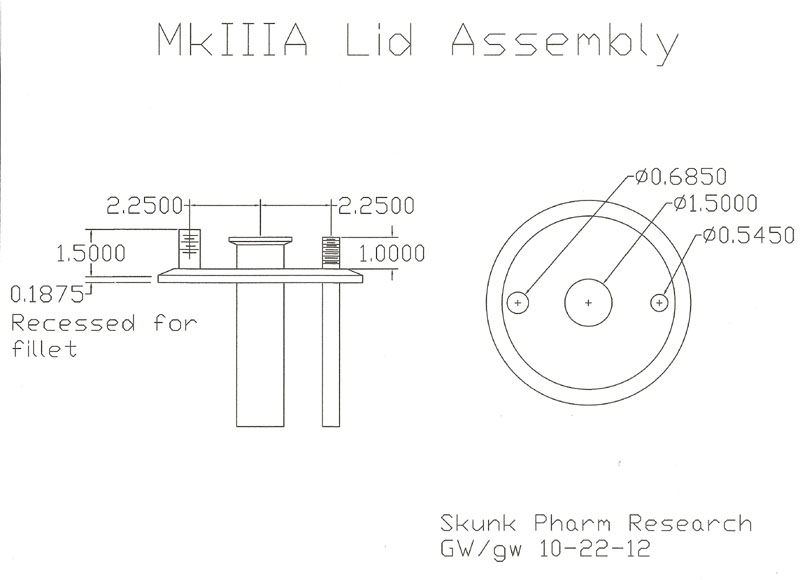
| 1.0 | Glacier Tank | |||||
| 1.1 | NPT 1/4" female X 1 1/2" end cap 304SS | 22MP-6025 | 1 | $10.95 | $10.95 | Glacier Tank |
| 1.2 | 1 1/2" Sanitary triclamp | MHM-150 | 4 | $5.90 | $23.60 | Glacier Tank |
| 1.3 | 1 1/2" X 24" Sanitary spool piece | SP-150-024 | 1 | $45 | $45 | Glacier Tank |
| 1.4 | 1 1/2" Teflon sanitary seals | 40MPG-150 | 2 | $1.20 | $2.40 | Glacier Tank |
| 1.5 | 1 1/2 X 1" Sanitary concentric reducer | B3114MP-C150-100 | 1 | $12 | $12 | Glacier Tank |
| 1.6 | 1 1/2" sanitary X 1" ball valve | BV-2CV-100 | 1 | $69 | $69 | Glacier Tank |
| 1.7 | 1 1/2 X 12" (1/2 of) sanitary spool | SP-150-012 | 1 | $35 | *$17.50 | Glacier Tank |
| 1.8 | 6" Sanitary tri clamp | 13MHM-600 | 2 | $29 | $58 | Glacier Tank |
| 1.10 | 6" X 6" sanitary spool | SP-600-006 | 1 | $97 | $97 | Glacier Tank |
| 1.10.1 | Or 6" X 12" sanitary spool (cut into two 6") | SP-600-012 | 1 | $120 | *$60 | Glacier Tank |
| 1.11 | 6" Sanitary end cap | 16AMP-G600 | 2 | $42 | $84 | Glacier Tank |
| 1.12 | Total in Mk IIIA configuration | $419.45 | ||||
| In Mk III configuration | $382.45 | |||||
| 1.0 | Special Seals | |||||
| 1.1 | 1 /12" Buna N sanitary seals with screens | N/A | 2 | $15.90 | $31.80 | Brewery Gaskets |
| 1.2 | 6" Buna N sanitary seal | W181663 | 2 | $14.92 | $29.84 | Sustainable Supply |
| 1.3 | Total | $61.64 | ||||
| 1.0 | Tank Bottom blanks required only for Mk III, not the MK IIIA | |||||
| 1.1 | Tank bottom laser cut to size | 1 | $33.50 | $33.50 | BBC Steel | |
| 1.2 | Total | $33.50 |
| NO | ITEM | PN | REQ | PRICE | COST | Source |
| 1.0 | Paramount Supply | |||||
| 1.1 | 1/4" 316SS tubing/.035 wall | 3405630 | 4' | $1.07/ft | $4.29 | Paramount Supply |
| 1.2 | 1/4 NPT to 1/4" Compression 304 SS | 4304913 | 2 | $7.56 | $15.12 | Paramount Supply |
| 1.3 | 1/4" X 4" 304 SS Sch 40 nipple/ 1/2 used | 3406164 | 1 | $1.57 | $1.57 | Paramount Supply |
| 1.4 | 1/4" Ball valve | 3492303 | 3 | $12.41 | $37.23 | Paramount Supply |
| 1.5 | 1/4" MPT X 1/4" Male flare brass | 1719939 | 3 | ~$3 | $9 | Paramount Supply |
| 1.6 | 3/8" X 3" 304SS nipple cut in half | 1 | ~$2 | $2 | Paramount Supply | |
| 1.7 | 3/8" X close 304SS nipple | 3406253 | 1 | $1.37 | $1.37 | Paramount Supply |
| 1.8 | 3/8" 304SS cross | 3449726 | 1 | $7.41 | $7.41 | Paramount Supply |
| 1.9 | 3/8" X 1/4" 304SS bushing | 3408515 | 2 | $1.16 | $2.32 | Paramount Supply |
| 1.10 | 1/4" X close 304 SS nipple | 3406105 | 1 | $1.14 | $1.14 | Paramount Supply |
| 1.11 | 3/8" 304SS ball valve | 3492311 | 1 | $14.88 | $14.88 | Paramount Supply |
| 1.12 | 3/8 MPT X 3/8" male flare brass | 1719980 | 1 | $0.93 | $0.93 | Paramount Supply |
| 1.13 | 1/4" X 6" 304SS nipple/Threaded one end | Special | 1 | $5.33 | $5.33 | Paramount Supply |
| 1.14 | Total | $102.59 |
| NO | ITEM | COST |
| 1 | Glacier Tank | $419.45 |
| 2 | Gaskets | $61.64 |
| 3 | Paramount Supply | $102.59 |
| 4 | Total parts | $583.68 |
1-22-12
Terpenator Operating Instructions
The Terpenator series are operated as follows:
1.0 Open all valves, except for valve #4, the butane supply valve.
2.0 Turn on high vacuum pump and pump system down to -29.5"Hg.
3.0 Close valves #1 and #3.
4.0 Turn off high vacuum pump and turn on the recovery pump.
5.0 Place one hand on the vent line exiting the top of the column and turn on valve #4.
6.0 When you feel the sudden chill of liquid butane reaching the vent tube, close valve #2, and then valve #4. Record the number of seconds required to flood the column with the existing packing density.
7.0 Continue to pump with the recovery pump, until the internal pressure is reduced to -10"Hg.
8.0 Open valve # 2 and valve # 4 for the same number of seconds that it took to flood the column the first time.
9.0 Close valve #2 and then #4 and continue to pump, until the system pressure is again reduced to -10"Hg.
10.0 Repeat steps #8 and #9 for as many cycles as you choose to run. Typically three cycles for the Mk IA and II, and five cycles for the faster Mk III and IIIA.
11.0 At the end of the last cycle, when the gauge hits -10"Hg, open valve #2 and then valve #3 to dump column.
12.0 Continue to pump until the system reaches -22"Hg, at which point close valve #5 and turn off the recovery pump.
13.0 Open valve #1, and turn on the high vacuum pump.
14.0 Pump the system down to -29.5"Hg and close valve #1.
15.0 Shut off the vacuum pump and allow the system to sit under hard vacuum for 5 minutes to purge.
16.0 Remove product from lower collection tank.



Dan, When deviating from design it's up to you to decide what operating parameters your going to run with and then making sure components exceed with safety factor. I am not a licensed engineer, and this is why extractor designs for market are certified by one. A third party whom will double check your math and materials to confirm you can use the device within the limits you intend to operate. Yeah your life is willing to take the risk. But the Public is not and didn't ask for it. Proceed at your own risk and if you do your homework like I mentioned earlier you will determine your own answer. So many of these diy go boooom and you read about them in the paper and on the news. Anything that could go wrong, will.
Dan, No disrespect but you need to learn the properties of butane pressure to temp differential. Learn butane by volume and weight. You cannot safely build one of your own unless you can answer some of these fundamental questions. You can get the answer from a calculator but can you show your work as to how you came up with the answer? If you cannot accomplish this please buy a prefab system that has a certified procedure to run with. Regards, Ryan
The reason I asked was there is an extractor design on this webpage that uses a paint pot rated at 110 psi. Another build used triclamps raited at 100psi.All the research I have done indicates that butane as a liquid will have little or no pressure. As the liquid warms it turns to a gas and increases in pressure. From my research I see most extractors operating around 30 psi. In addition, the method of opperating a top flood passive closed loop have been very well documented.
Hi, I am in the process of building a closed loop. I plan on useing a 12" spool for the collection pot, I have found a domed lid, I wrote the seller asking for its specs. They informed me it was " guaranteed to 100psi". Will this lid be suitable for this purpose?
Two questions, does the butane "feed" into the bottom of the long tube (used to hold unprocessed material) then exit the top of the long tube into the canister or am I reading the schematics wrong? If it flows bottom to top of the long tube why that way instead of top to bottom letting gravity assist in moving materials? My thinking is that not all of the final product would be removed in a bottom to top flow, please correct me if wrong :) Not sure if you addressed this in the water build up issue, and forgive me if I'm saying things you've already done but have you tried pulling a series of vacuum cycles with butane lines closed and butane recovery pump closed first? I saw your latest schematic has the vacuum pump lines separate from the butane feed/return lines so I'm assuming you have. Does your system flow butane on a vacuumed system and lines or is the vacuum only used to remove butane from final product? I've only worked with automotive A/C recovery/vacuum/charge systems but I'm assuming the process is similar. In those machines the vacuum is used to remove moisture with the drier only used for MINIMAL moister that wasn't removed, more as a safety backup than moisture removal is my point. While air has a lot of moisture plants have a great deal of moisture, even after drying for days. I would think multiple vacuum cycles should reduce overall moisture getting into the butane or system as a whole. If it won't reduce ALL moisture it might at least make the drier last longer.
Wrong, when flooded top to bottom gravity puts into effect the taking the course of lease resistence effect, causing some tighter packed areas to possibly be missed, so by flooding from bottom to top this is corrected as the solvent must flow over every inch of the material, bottom to top, as it fills up, this can also still be stalled same as top to bottom can if that was desired
[…] trademarked his name ‘the terpenator’. You can find his designs on his website www.skunkpharmresearch.com, Advancements in peoples habits also spurned this website owner to share his knowledge and cater for […]
I so want to build one of these. i have a really nice freezer compressor pump so I guess that is half the battle. has anyone tried to do a kick-starter or something. i would love to use the right stuff and not pollute the environment but i cant afford to build one.. Thanks due to the pharm we're all scientist/chemists here so at least they aren't trying to sell me something for 5x the price.
How much weight in butane can #30 and #50 refrigerant recovery tanks hold?
The ratings are for how much water the tanks can hold. n-Butane weighs 60.1% as much as water. LPG requires expansion space in the tank, to deal with rapid thermal expansion, so an 80% fill is all you can safely/legally put in them. 30# X .601 X .80= 14.4# n-Butane 50# X .601 X .80= 24# GW
Hello! First off thank you so much for spreading your knowledge with everyone! I just purchased the Mk3 1LB extractor and I have a few questions about passive recovery. When flooding the column 3 times, do you start recovery after the first 2LB wash and proceed to add butane while its recovering? Or do you wait until the first round of butane has been recovered fully to do your 2nd wash and so on? (ex. pull 2lb of butane through the column then shut valve #4, then open valve #5 once butane reaches the collection pot, fully passively recover, close valve #5 then proceed to add 2 LB more of butane, recover it. Then add the 3rd wash, dump with the dump valve. close #3 dump valve, recover)
i have been packing my mk111 column on both ends with 2 or 3 coffe filters packed pretty tight and ive still been getting tiny flecks of plant material in my end product ,should i use more filters or? any feed back would help,
Hey gw I just received a unit similar to the mkIII but it has a top flood and it has a large column about 2 pounds. The problem I'm having is I'm only getting around 3 pounds of butane to enter and it takes my 2 hours to get that butane back out with heat on the collection and ice bath recovery and I have a g5 refrigeration pump and I'm getting a horrible return my 30g for a 2 pound run....
I've got a mk3 with 1 1/2 x 24" column. What the biggest column I could change to?
Machine Inquiries/ Product Services/ Consultations carla@specializedformulations.com 503-775-5003 Mon-Fri 8am-6pm PST
I am planning on building the Mk. IIIa, and would love to be able to ask someone a few questions regarding the lid...... Thank you Gray Wolf and(and Skunk Pharm), I have learned almost everything I know about SAFE extractions from you, I am a member on another forum where your knowledge gave my wife and I our quality of life back.
Machine Inquiries/ Product Services/ Consultations carla@specializedformulations.com 503-775-5003 Mon-Fri 8am-6pm PST
I was wondering how to keep the recovery pot at an exact temp. Or do I just control the temp of the water used when reclaiming a wash?
with the mark 111 i just dip a couple times into 65- 72 f during the dump of each column .. in the 12 ' i actually add 65-72 f water to bottom holding rubbermaid (cant find a big enough soup warmer yet lol ) during dump then suck it back out for next column ..
looking for Denatured Alcohol in Canada, it appears that it is difficult to find, I found a place that carries Capt Phab DA in a 90:10 mix, that is 90%Ethanol:10%Methanol. CAN i use this with my dry ice to chill my #100 storage tank?
Try BioFlame from Canadian Tire. 95% Ethanol, 5% ISO. Otherwise Everclear is available in Calgary or Edmonton....can't remember which.
thanks .. got a case of Everclear sent from edmonton already ... $40 a bottle lol i use it for winterizing ... thanks i will try the BioFlame
so how much Denatured Alcohol do i put in ? Do i cover bottom of my #100 tank that is sitting in the tub .. then add the dry ice ?
Everclear/ethanol is not used for the initial purge, at least not under pressure. If you have a 100# recovery tank then that is for butane gas. After you have extracted with butane and boiled it off then you pour that BHO into ethanol and let sit in the freezer to extract waxes. after that you boil off the ethanol/everclear and bake to obtain winterized shatter....... please do not try to recover ethanol/everclear into a refrigerant recovery tank.
no no i know about winterizing .. that is not what i want it for .. im trying to get my butane #100 tank as cold as possible before i blast it thru so to pick up less wax and also it speeds up recovery ... my lazy ass did some reading so i know how now .. thanks for ur reply
Hi All, Long time terp-er here, but over the last 3 runs I have run into an issue. I am getting extract traveling up my reclaim port and depositing in my SS cross, 3/8" ball valve, and reclaim hose. I haven't changed up the procedure that I know of, and have experienced this with two different recovery pumps, one being the Appion. Has anyone had this issue come up before? Thanks, Step
only thing that caused that for me was opening valves too fast .. especially overflow .. good luck
Thanks for the reply. When you say overflow, do you mean the vent tube?
yes valve #2
i feather it open as i watch the gauge ... if u do have stuff going thru run straight butane for a while ... see if that cleans it out .. OH and filter dryers EVERYWHERE .. lol to check ur butane let some out and check for stickiness .. if any of this helps thank Carla .. she is my angel
can i blast keif with mk iii ? anything i should know prior ? Appreciate any tips .. thanks
pack keif loosely with material to avoid pressure spikes from clogging
I am currently building this setup and wanted to use two 2'x24 columns similar to how the MKV is setup. Basically this would be a mini MKV. Would the bottom chamber be from the MKIII be big enough for those columns?
Are there any videos showing the complete operation of a Mk 3? I don't fully understand the process of whats going on inside with the fill, drain, wash. Basically I'd like to know the flow of the fluid inside the unit. I understand it's filled from the bottom up and then the top vent and fill valves are shut off....but then what?
The flow is. Cycle one two and three r from bottom up thru material. Then last is from overflow down thru material and then opening main dump valve empties all product into bottom vessel. Hope this helps.
We have videos here. http://www.specializedformulations.com/
Have you found a Teflon or BUNA-N Butterfly Valve Seat to replace the EPDM Seat that comes in it? By not replacing it, you are introducing rubber into the butane, same as with silicone. I am concerned about this with ALL closed-loop systems as every Butterfly valve is made with rubber as the standard. Glacier Tanks only sells EPDM & Silicon replacements. I've been looking all over to find a suitable replacement with no luck.
The Terpenators use ball valves, all the ball valves we use have PTFE (Teflon) seats. Glaicer Tanks does sell ball valves with PTFE seats.
Hi Zack! We don't use butterfly valves. We use stainless ball valves with PTFE seats and seals. Butterfly valves wear faster and are harder to keep sealed.
hello all, i have finished my experimenting in oil, and have 3 of both the mark iii and v (w/ 1 3' section, not 2x2) setups, along with literally 10-20 of every part needed to make either (reducers, endcaps with npt, 6 or 12 spools, etc). i won't be selling the appions because of concerns and problems with used ones. if anyone is interested in buying please contact me at terpenatorparts@gmail.com, i know glacier is sold out pretty much 24/7 so hopefully this brings parts to those who need them. i also have lots of improved parts (ie: 3/8 npt -1/4 flare, eliminating the need for bushings, etc) i can send pics.
[…] More Mk III info at http://skunkpharmresearch.com/mk-iii-terpenator/ Reply With […]
wondering where i can buy a MK III ?
Specialized formulation
Machine Inquiries/ Product Services/ Consultations carla@specializedformulations.com 503-775-5003 Mon-Fri 8am-6pm PST
what piece are you welding into the top of the 2" sanitary cap to except the gyrolocks? i don't see it on the paramount list, and want to get the best thing for the job, can you get a link/part number? thanks so much for all your hard work testing after this version is done, i'm going for a 4/5 design :)
I was trying to pin down the exact parts list to build and operate an mkiiiA but am a little confused by the way it is listed. Is it possible to send me the list via email? Thanks in advance for any help you can provide Rezcominnovations@gmail.com
Ha I can't make my mind up between the Phx and the IIIA lol. Do you have a list for the phx?
Been running my MKIII as a passive unit. Having done about 20 runs thus far. Got it dialed in passively. I use a 1.5" dia x 4' column. Easily holds a QP. I run it by attaching the solvent tank upside down on top of the column like a tamisium with the recovery pot chilled at or below 26° ice salt bath. To transfer the butane back I set the recovery pot at 160°F and the storage tank at or below 26°F or less using a thermo gun for verification. I get almost 100% recovery after 24hrs. I am able to set it and come back the next day weigh my tank and its on or -.1 lb. Problem is, with that size column comes a good size pool ol' oil in the bottom of the 6" dia tank. Takes awhile to recover and it will not complete it in said 24hrs if the recovery pot is under 160°F. I tried it at 120°F and no dice. Only about 66% butane transfer after 24hrs. Also tried different ice melters for better cooling effect on storage tank but then the ice doesn't last long enough. I am impressed with this setup because I can make loads of honey oil passively. Hopefully this info will help others. Now I want to make shatter which needs lower recovery temps. GW, do you still recommend the Appion G5 as the pump of choice for the MKIII as far as durability in its price range? Or something different? I am trying to have the setup maintenance free as possible. Thanks to SkunkPharm, making some fine oil in Michigan for some fine folks :-)
I think I've got some moisture build up in my recovery tank. I'm currently running my mkIIIA with a Ek-032 mf on the incoming butane line. I'd like to put another filter before the appion pump. What would you recommend, and how often do you replace these?
I think I've got some moisture build up in my recovery tank. I'm currently running my mkIIIA with a Ek-032 mf on the incoming butane line. I'd like to put another filter before the appion pump. What would you recommend, and how often do you replace these? Also, is is possible to clean and dry butane that has moisture pick up or is it best to start over with fresh? Thanks again!!!
Turn your tank upside down and chill it. Butane will absorb water, but it doesn't like it, so when you chill the butane it drops out relatively fast. Crack the tank vent valve to vent any liquid water. Use a larger filter dryer from http://www.emersonclimate.com/Documents/FlowControls/pdf/systemprotectors/catalog/EK_Filter_Drier_Capacity_Tables.pdf
Can you plz detail the process of chilling and venting the water: is it turn tank upside down and put in den. alcohol and dry ice and wait a bit then take out of chiling tote then turn upright and open liquid valve and tilt tank to pour out water? seems like this wouldn't work...Thank you for pending answer and time. Love you guys Former student at the shack
They make larger versions of the Ek-032. It is the smallest in the series. Here is a list of sizes. Note the inlet and outlet types, but consider that you can bush up or down to use any of them. http://www.emersonclimate.com/Documents/FlowControls/pdf/systemprotectors/catalog/EK_Filter_Drier_Capacity_Tables.pdf
Hey SPR, Is it possible to purchase a MK3 prebuilt? I think I will have a difficult time trying to assemble one myself. Thanks!
You might contact Specialized Formulations at specializedformulations.com and see if they can get that done for you.
Appion G5 ? = When doing the seal rebuild is there another source for the hard plastic seal on the piston? The one that goes over the 0 ring on the piston. I ruined one trying to get it on the piston and would like to not have to buy a whole new kit just for one of the hard plastic seals. thanks as always. stay warm friends.
Not that I know of.
Hey SPR, I wanted to start by thanking you for all the information you have shared. I went and read every question and response on this post, but have not found my question asked yet. I’ve finished putting together my MKIIIa and have done three runs now, but my end product keeps coming out very dark, almost black. I am using a thermometer in the soup warmer and H2O temps start around 80° F, climb to 95ish then drop to mid-40s on final purge. Do you guys use anything below your collection pot so that it is not sitting directly on the soup warmer? I have a feeling that the H2O may be around the 80’s but the metal is hotter. Thanks for everything!!
For blonde shatter, we set the Mk III beside the soup pot, and only occasionally dip it in it to de-ice the lower end so we can what level the puddle is at. That takes the internal temperature to 25/50 degrees below zero.
Ok, so I did as you explained and processed without using any heat and I ended up with a nice golden crumble. To obtain shatter or wax from this I would need to vacuum purge and apply some heat?
Yes, there is still butane present. I like to vacuum purge the crumble at 115F and -29.5" Hg to get shatter.
Most of the time when I see oil come out dark or black when the temps are in range is due to several factors in my experience. 1- If the starting material has been ground up. Don't grind your material. Check out GW's "Nug Buster" for the best size. 2- Some strains are very dark. This is rare, but some strains produce a dark product vs. a blonde product. 3- Old material that was decarboxylated due to poor storage conditions.
I agree temperatures and age are the cause of the dark color but is blonde oil better. I think not, I am really enjoying extractions from 30 day old material. After I learned how to make the blonde stuff I realized I did not like it. I know everyone wants blonde oil but i prefer extractions from aged material. Call me crazy.
We are having further problems with valve leakage. This time, we are seeing small bits of oil coming out of the large 1.5" ball valve (#3), or the "dump valve". This is on top of having major issues with butane leakage from the normal valves, even when they are new. Have you seen this issue with the large dump valve before? What do you recommend to fix the issue, replacing the valve or cleaning it out?
I infer that we are talking about leaks at the valve stem, in which case I have seen leaks at the stems on both types as received and pressure tested, but except for one occasion, was able to seal it by simply tightening the packing gland nut. On that occasion, it was the large three piece dump valve from Glacier, and I returned it. I've also seen valve packing wear out, requiring repacking or valve replacement. The one piece valves are under $20 each from Paramount Supply, so we just replace them, and the whole reason for the more expensive three piece valve, is that complete rebuild kits are available for them. Have you taken the handles off all the valves and tightened the packing gland nut yet?
Thank you for the tips. Yes, tightening the packing gland worked wonderfully.
I've had this happen with the 3/8" and 1/4" WOG valves from paramount. Tightening the packing gland nut on the valve did the trick. I would recommend taking the large sanitary dump valve apart and cleaning it with acetone and > 90% isopropyl rubbing alcohol. The packing glands are made of Teflon and the entire assembly is rather easy to clean and put back together.
I have a brand new never used Mk 3 Terpenator with a extra tube and tank, all hoses, fittings, recovery tank & pumps, soup warmer, this is a full set up all you need is material to run and we have that as well. Every thing is new but the vacuum pump but it is only a year old with very little use. We have decided to go another way. Email me for details...Cash only..email ssoma151@gmail.com
Hi Guys, We have had a lot of luck extracting dry material at about 150g per 1.5"x24" column. However, in switching over to processing fresh, frozen material we have experienced column blockage at packing densities over ~175g per column. Symptoms include low gauge pressure during floods and short recovery times. The coffee filters at the top of the tube seem to become saturated with water and act as a barrier to the butane. Is standing water on our fresh material causing these filters to wet? Are we at risk of dissolving any water into our butane at this operating temperature? We have been taking the vacuum bags out of the freezer and allowing the material to dry to the touch before packing, or so we think. We did a test without coffee filters and were able to see more traditional pressure readings for flood cycles with ~20F butane (~15psi), but of course a little bit of debris made it to the recovery pot. How much fresh material do you all normally get in a column of this size?
I generally pack around 120-130g if the material is wet-ish. I just firm it down without packing. The water will develop into rusty water that will ruin you future extract's.
n last on the column heast question is , Is this stuff comparable to the tape from Platt ? http://www.homedepot.com/p/Frost-King-60-ft-Roof-De-Icing-Cable-Kit-RC60/100187093#.UpQyANKsiSo thanks.
Looks to be about the same at a way better price than Pratt!.
Is this the animal you recomend or is there another "controller part " not in this setup I would need to make it work on a 24" column? thanks again. I'm trying to get over this "damn it s cold out" hump as quick as I can. https://www.platt.com/platt-electric-supply/Heat-Cable-Preassembled/Raychem/W51-24P/product.aspx?zpid=156499
That is the one we used, and they are self regulating.